Sunday, July 31, 2016

How To Hard Reset (Master Reset) LG G3

STEPS >>
  • Turn off the device.
  • Press and hold the Power and Volume down keys on the back of the device.
power volume down.png
  • When the LG logo appears, release and then re-hold the Power key while continuing to hold the Volume down key.
  • The Factory data reset screen appears.
  • Press the Volume down key to advance the cursor until Yes is selected.
  • Press the Power key to confirm.
  • The Erase all user data and restore default settings screen appears.
  • Press the Volume down key until Yes is selected.
  • Press the Power key to confirm.
  • The device restarts. Wait until the process is finished.
  • Your device is now reset to its original factory settings.


WARNING!
Hard Reset will erase all of your data
All described operations you are doing at your own risk.


Sunday, July 24, 2016

How To Format MTK Android Devices Using Volcano Box

Its another new day with another fresh post!
Today, i will show you some tips on how to format MTK Android device using Volcano Box.

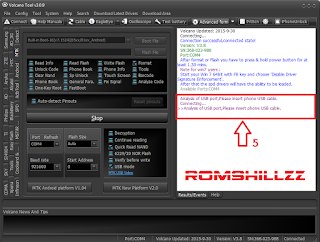
After you have successfully flash an MTK Android device with a new Stock ROM, you will need to perform a hardreset. In the process of wiping user data it shows ....Wiping data.. Mount/data error! This is what you need to do.

OBSERVATIONS:
This problem mostly happens to TECNO H5, H7, M3 etc...

you will need to format that MTK android device using Volcano Box.

STEPS >>
  • Download volcano box tool here
  • Select MTK
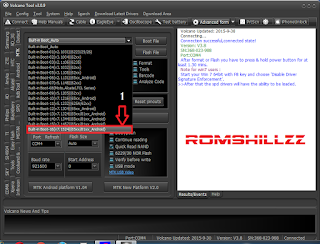
  • Click on Built-in Boot_Auto and select chip e.g Built-in Boot 16(v7.1524)(65xx/81xx_Android)
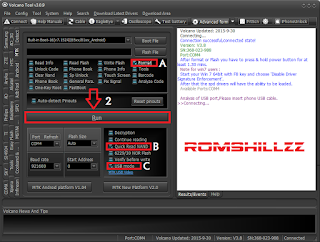
  • Tick Format
  • Tick Quick Read NAND
  • Tick USB mode (when you are using a USB cable)
  • Tick Auto-detect Pinouts (when you are using volcano pinout cable)
  • Click on the "Run" button, this will appear >>
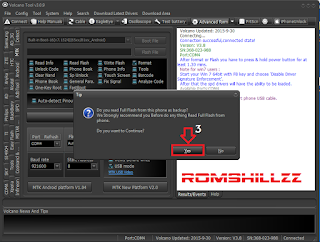
Do you read Full Flash from this phone as backup?
We Strongly recommend you Before do any thing Read Full Flash from phone.

Do you want to Continue?

                                         YES         NO
  • Click Yes
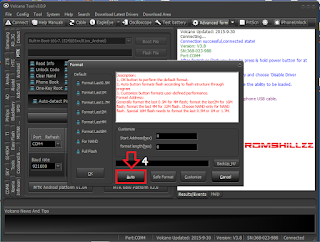
  • A Format option will be displayed Click "Auto" (meaning Auto Format)
  • Connect device >> holding volume + and volume - button of your device or holding power button only
  • Once device is connected, Format begins
  • Patiently wait while the process completes
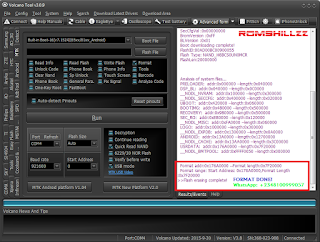
Format addr:0x176A0000 --Format length:0x7F20000
Format range: Start Address: 0x176A0000,Format Length:0x7F20000
>>Flash erasing complete!


Friday, July 22, 2016

Identifying Your Nokia evice Group & Model DCT1 DCT2 DCT3 DCT4 ,4+ BB5

These are of list categories in which Nokia devices are being classified.


Nokia DCT-1

Nokia 1011 Nokia 1610 Nokia 1611 Nokia 1620 Nokia 1630 Nokia 1631 Nokia 2010 Nokia 2040 Nokia 2110 Nokia 2110i Nokia 2114 Nokia 2140 Nokia 2148 Nokia 2148i Nokia 2160 Nokia 2160i Nokia 2170 Nokia 2180 Nokia 2190 Nokia 9000 Nokia 9000i

Nokia DCT-2

Nokia 3110 Nokia 3110 PlusNokia 8110 Nokia 8110i Nokia 8146 Nokia 8148 Nokia 8148 (nk502)Nokia 8148i Nokia nk502

Nokia DCT-3

Nokia 2100 Nokia 3210 Nokia 3210 Nokia 3310 Nokia 3315 Nokia 3330 Nokia 3350 Nokia 3390 Nokia 3390 Nokia 3391 Nokia 3395 Nokia 3410 Nokia 3610 Nokia 5110 Nokia 5110i Nokia 5110i APACNokia 5120 Nokia 5125 Nokia 5130 Nokia 5160 Nokia 5170 Nokia 5170i Nokia 5180 Nokia 5180i Nokia 5185 Nokia 5185i Nokia 5190 Nokia 5210 Nokia 5510 Nokia 6080 Nokia 6081 Nokia 6090 Nokia 6091 Nokia 6110 Nokia 6120 Nokia 6120i Nokia 6130 Nokia 6138 Nokia 6150 Nokia 6160 Nokia 6161 Nokia 6162 Nokia 6180 Nokia 6185 Nokia 6185i Nokia 6188 Nokia 6190 Nokia 6210 Nokia 6250 Nokia 7110 Nokia 7160 Nokia 7190 Nokia 8210 Nokia 8250 Nokia 8260 Nokia 8265 Nokia 8265i Nokia 8270 Nokia 8280 Nokia 8280i Nokia 8290 Nokia 8810 Nokia 8850 Nokia 8855 Nokia 8860 Nokia 8890 Nokia 9110 Nokia 9110i

Nokia DCT-L(inda) [Communicator]

Nokia 9210 CommunicatorNokia 9210 CommunicatorNokia 9210i CommunicatorNokia 9290 CommunicatorNokia 9300 (APE)Nokia 9300 (APE)Nokia 9300i (APE)Nokia 9500 Communicator (APE)Nokia 9500 Communicator (APE)

Nokia DCT-4

Nokia 1100 Nokia 1100 Nokia 1101 Nokia 1108 Nokia 1110 Nokia 1110 Nokia 1110i Nokia 1112 Nokia 1112 Nokia 1112i Nokia 12i GSM ModulNokia 1600 Nokia 1600 Nokia 2112 Nokia 2125i Nokia 2126i Nokia 2128i Nokia 2255 Nokia 2300 Nokia 2300 Nokia 2355 Nokia 2600 Nokia 2650 Nokia 2651 Nokia 2652 Nokia 2760 AmericasNokia 2760 Europe/AsiaNokia 30 TerminalNokia 3100 Nokia 3105 Nokia 3108 Nokia 3120 Nokia 3120 Nokia 3125 Nokia 3128 Nokia 3129 Nokia 3152 Nokia 3155 Nokia 3155i Nokia 3200 Nokia 3205 Nokia 3205i Nokia 3220 Nokia 3220 Nokia 3230 (WD2)Nokia 3300 Nokia 3300 Nokia 3320 Nokia 3321 Nokia 3360 Nokia 3361 Nokia 3510 Nokia 3510i Nokia 3520 Nokia 3530 Nokia 3560 Nokia 3570 Nokia 3585 Nokia 3586 Nokia 3586i Nokia 3587 Nokia 3587i Nokia 3588i Nokia 3589i Nokia 3590 Nokia 3595 Nokia 3595i Nokia 3600 (WD2)Nokia 3620 (WD2)Nokia 3650 (WD2)Nokia 3660 (WD2)Nokia 5070 Nokia 5070 Nokia 5100 Nokia 5140 Nokia 5140 Nokia 5140i Nokia 6010 Nokia 6012 Nokia 6015 Nokia 6015i Nokia 6016i Nokia 6019i Nokia 6020 Nokia 6020 Nokia 6021 Nokia 6030 Nokia 6030 Nokia 6050 Nokia 6060 Nokia 6060 Nokia 6061 Nokia 6070 Nokia 6070 Nokia 6080 Nokia 6080 Nokia 610 Car KitNokia 6100 Nokia 6101 Nokia 6101 Nokia 6101 Nokia 6102 Nokia 6102 Nokia 6102 Nokia 6102 Nokia 6103 Nokia 6103 Nokia 6108 Nokia 6111 Nokia 6112 Nokia 6152 Nokia 6155 Nokia 6155i Nokia 616 Car KitNokia 6170 (TIKU)Nokia 6170 (TIKU)Nokia 6200 Nokia 6220 Nokia 6225 Nokia 6225i Nokia 6230 (TIKU)Nokia 6230 (TIKU)Nokia 6230i (TIKU)Nokia 6235 (TIKU)Nokia 6235i (TIKU)Nokia 6236i Nokia 6255 (TIKU)Nokia 6255i (TIKU)Nokia 6256 Nokia 6256i Nokia 6260 (WD2)Nokia 6260 (WD2)Nokia 6310 Nokia 6310i Nokia 6340 Nokia 6340i Nokia 6360 Nokia 6370 Nokia 6385 Nokia 6500 Nokia 6510 Nokia 6560 Nokia 6585 Nokia 6590 Nokia 6590i Nokia 6600 (WD2)Nokia 6610 Nokia 6610i Nokia 6620 (APE)Nokia 6650 Nokia 6651 Nokia 6670 (WD2)Nokia 6670 (WD2)Nokia 6800 Nokia 6800 Nokia 6810 Nokia 6820 Nokia 6820 Nokia 6820i Nokia 6822 Nokia 6822 Nokia 7200 Nokia 7210 Nokia 7250 Nokia 7250i Nokia 7260 Nokia 7270 (TIKU)Nokia 7270 (TIKU)Nokia 7280 (TIKU)Nokia 7280 (TIKU)Nokia 7360 Nokia 7380 Nokia 7600 (TIKU)Nokia 7610 (WD2)Nokia 7610 (WD2)Nokia 7620 Nokia 7650 (WD2)Nokia 7700 (APE)Nokia 7710 (APE)Nokia 810 Car KitNokia 8310 Nokia 8390 Nokia 8587 Nokia 8800 (TIKU)Nokia 8800 Sirocco Edition (TIKU)Nokia 8801 (TIKU)Nokia 8910 Nokia 8910i Nokia D211 Nokia N-Gage (WD2)Nokia N-Gage QD (WD2)Nokia Remote Camera

DCT-4+ (Plus)

Nokia 1200 Nokia 1208 Nokia 1208b Nokia 1209 Nokia 1650 Nokia 1650b Nokia 1680c-2b ClassicNokia 2310 Nokia 2600c Nokia 2610 Nokia 2610b Nokia 2626 Nokia 2630 AmericasNokia 2630 Europe/AsiaNokia 2670h FoldNokia 5000 Nokia 5000 Nokia 7070

BB5.0

Nokia 3109 ClassicNokia 3109 ClassicNokia 3110 ClassicNokia 3120 ClassicNokia 3250 Nokia 3500 ClassicNokia 3500 ClassicNokia 3600 SlideNokia 3610 Nokia 5200 Nokia 5200 Nokia 5220 XpressMusicNokia 5220 XpressMusicNokia 5300 XpressMusicNokia 5300 XpressMusicNokia 5310 XpressMusicNokia 5310 XpressMusicNokia 5320 XpressMusicNokia 5320 XpressMusicNokia 5320 XpressMusicNokia 5500 Nokia 5500 SportNokia 5610 XpressMusicNokia 5610 XpressMusicNokia 5700 XpressMusicNokia 5700 XpressMusicNokia 5710 XpressMusicNokia 5710 XpressMusicNokia 6085 Nokia 6085 Nokia 6086 Nokia 6110 NavigatorNokia 6110 NavigatorNokia 6120 ClassicNokia 6120 ClassicNokia 6121 ClassicNokia 6124 VodafoneNokia 6125 Nokia 6126 Nokia 6126 Nokia 6131 Nokia 6131 NFCNokia 6133 Nokia 6133 Nokia 6133 Nokia 6135 Nokia 6136 Nokia 6136 Nokia 6151 Nokia 6210 NavigatorNokia 6210 NavigatorNokia 6210 NavigatorNokia 6210 NavigatorNokia 6212 ClassicNokia 6220 ClassicNokia 6220 ClassicNokia 6233 Nokia 6233 Nokia 6234 Nokia 6267 Nokia 6270 Nokia 6280 Nokia 6282 Nokia 6288 Nokia 6290 Nokia 6300 Nokia 6300 Nokia 6300i Nokia 6301 Nokia 6301 Nokia 6500 ClassicNokia 6500 ClassicNokia 6500 SlideNokia 6500 SlideNokia 6555 Nokia 6555 ClassicNokia 6556 ClassicNokia 6600 FoldNokia 6600 SlideNokia 6630 Nokia 6631 (NM850iG)Nokia 6650 T-MobileNokia 6680 Nokia 6681 Nokia 6682 Nokia 7310 SupernovaNokia 7310 SupernovaNokia 7370 Nokia 7373 Nokia 7390 Nokia 7500 PrismNokia 7500 PrismNokia 7510 SupernovaNokia 7510 SupernovaNokia 7610 SupernovaNokia 7610 SupernovaNokia 7900 PrismNokia 8600 LunaNokia 8800 ArteNokia E50 Nokia E50 Nokia E51 Nokia E51 Nokia E60 Nokia E61 Nokia E61i Nokia E61i Nokia E62 Nokia E65 Nokia E66 Nokia E66 Nokia E66 Nokia E70 Nokia E70 Nokia E71 Nokia E71 Nokia E71 Nokia E90 CommunicatorNokia E90 CommunicatorNokia N70 Nokia N70 Nokia N71 Nokia N71 Nokia N72 Nokia N73 Nokia N73 Nokia N75 Nokia N76 Nokia N76 Nokia N77 Nokia N77 Nokia N77 Nokia N78 Nokia N78 Nokia N78 Nokia N79 Nokia N79 Nokia N79 Nokia N80 Nokia N80 Nokia N81 Nokia N81 Nokia N81 Nokia N81 Nokia N82 Nokia N82 Nokia N85 Nokia N85 Nokia N85 Nokia N90 Nokia N91 Nokia N91 Nokia N91 Nokia N91 Nokia N92 Nokia N92 Nokia N93 Nokia N93 Nokia N93i Nokia N93i Nokia N95 Nokia N95 8GBNokia N95 NAMNokia N95 8GB NAMNokia N95 Nokia N95 Nokia N96 Nokia N96 Nokia N96 Nokia NM705i (DoCoMo)


Please Leave a comment after using this Tutorials
Like my Facebook page!


Tuesday, July 19, 2016

How To Flash Nokia Phones Using Cyclone Box

There are many ways in flashing Nokia phones, there are also many boxes use in flashing Nokia devices. This post will show you how to flash Nokia BB5 phones using Cyclone Box.

STEPS >>
  • Download Cyclone Box setup here
  • Launch
  • Click Nokia Tool
  • Click Connection
  • Select Cyclone Interface (when using Cables or UFC4 pin-out)
  • Select USB (when using USB)
  • Select BB5(RAP,Broadcom,XGold2)
  • Click Add Image and select the device flash file where it is located
  • When selecting flash file, MCU comes first followed by PPM then CNT
  • Unmark Backup RPL
  • Click Write All Flash Images
  • Connect device >> Remove battery >> Plug USB cable>> Reinsert battery
  • When device is connected patiently wait for the process to complete

Follow the screenshots or read the tutorials above


WARNING!
Flashing will erase all of your data
All described operations you are doing at your own risk.

Monday, July 18, 2016

How To Flash MTK Android Devices Using Miracle Box

Using the Miracle Box is quiet complicated to some people, although to some its easier!
On this post i will show you on how to flash MTK Android devices Using Miracle Box.

Requirements
  1. MTK Android Stock ROM download here
  2. Download Miracle Box Setup here or use Cracked Version
  3. Download Miracle Box Drivers here
Tools & Drivers updates here

STEPS >>

  • Launch Miracle Box
  • Click MTK
  •  Select Write
  • Select Format ALL[Android] (Optional but recommended)
  • Click on the folder-like button to select Stock ROM/FIRMWARE on the location it is saved
  • After Selecting Stock ROM/FIRMWARE,
  • Click on the Start button
  • Connect device holding volume + and volume - key or power key only
  • When device is connected, Select Block will pop-out, Click OK
  • Patiently wait while the process completes
  • Once the process has been completed, it displays the following
 Write Done.
 >>Total time: 5 mins 58 s (depending on the time taking)

Follow the Screenshots below or read the tutorials above


WARNING!
Flashing will erase all of your data
All described operations you are doing at your own risk.


==> Learn how to flash SPD Android devices Using Miracle Box from here


WhatsApp +234 81 009 99057
Facebook.com/romshillzz
Twitter @romshillzz
Email: romshillzz@gmail.com

DONATE!
Donation of any kind is acceptable.

MY NAIJA GUYS SHOW SOME LOVE BY SENDING RECHARGE CARDS [MTN & AIRTEL]

How To Flash Nokia Microsoft Mediatek Devices Using Infinity Best Dongle

Most of you have been wandering on how to flash Nokia Microsoft MediaTek devices.
This post will show you on how to do that.

Points to note
Make sure you have downloaded the exact flash file for the particular device yo want to flash
Make sure the device battery is at least 25% charged

STEPS >>

  • Download Infinity Box (Dongle) Setup here
  • Launch
  • Click MediaTek
  • Click Flashing
  • Tick Use Ini for flash file to be automatically selected in the folder it is stored
  • Tick Manual to manually select flash file on the folder you have stored them
  • Select device model in the Model Select box
  • Tick Factory Settings
  • Click FLASH
  • Connect device >> Remove battery >> Plug USB cable >> Reinsert battery
  • Once device is connected patiently wait for process to complete
  • Once the process has been completed, disconnect device
  • Reinsert battery & power on.

Follow the Screenshots or read the tutorials above


Watch Full Video ⤵


WARNING!
Flashing will erase all of your data
All described operations you are doing at your own risk.
DOWNLOAD NOKIA MICROSOFT MEDIATEK FLASH FILES


Download Nokia Microsoft MediaTek Flash files.

This are flash files for Nokia Microsoft MediaTek devices

Download Infinity Box Best Dongle Setup from here

Learn how to Register & Get a License Info/File for Infinity Best Dongle from here

Learn how to flash this device using Infinity Best Dongle from here

Note
Follow the instructions on how to flash Nokia devices carefully from the link above
I will not take responsibility on whatever may happen to your device.

Make sure you are downloading the exact Flash file of the device you want to flash because 
 flashing a wrong flash file, will make the device completely dead 
(can't power on, can't charge and sometimes not be detected by a computer)


Learn how to download any Nokia Flash file using Infinity Best Dongle from here


Please Leave a comment after using these Flash files
Report if you cannot download any of these files.


Friday, July 15, 2016

DOWNLOAD ALL NOKIA FLASH FILES

These are Flash files for Nokia Devices. Most Flash files flashed on Nokia devices are .MCU .PPM, .CNT (IMG) & .FPSX Flash files, while those flashed on Nokia MediaTek's devices are _eMP Flash files, and for those flashed on Nokia Microsoft (Lumia) Devices are .FFU Flash files. Nokia devices are classified based on their products (brands, manufacturers) for example we have the DCT3 Nokia, DCTL Nokia, DCT4 Nokia, WD2 Nokia, BB5 Nokia, UFSx Nokia, MediaTek Nokia, Microsoft Windows Nokia e.t.c. Now it is left for your to identify which group your Nokia Device belongs to. There are special tools used in flashing these devices just like the Infinity Best Dongle, Cyclone Box, HWK, PhoenSuit e.t.c. Note: [*] Follow the instructions on how to flash these devices provided on the page carefully, I will not take responsibility on whatever may happen to your device. [*] Make sure you are downloading the exact flash file of the device you want to flash because flashing a wrong flash file can make the device completely dead (can't power on, can't charge and will not be detected by a computer).


Below is the direct link to download All Nokia Flash Files Including the Cloned Nokia Devices and Tutorials on how to flash any Nokia Device.

DOWNLOAD ALL NOKIA FLASH FILES HERE


How To Flash Nokia Devices

  • Learn how to flash Nokia Phones using Infinity Best Box from here
  • Learn how to flash Nokia Microsoft MediaTek devices from here
  • Learn how to flash Nokia BB5 Phones using Cyclone Box here
  • Learn how to flash Nokia Symbian Phones using Infinity Best Box here
  • Learn how to flash Nokia Symbian Phones using Cyclone Box here
  • Learn how to flash Nokia DCT4 Phones here

Learn more:

Important Notes:

[*] Take a Backup of your personal data before flashing or installing any Stock ROM (Firmware) or Flash file on your smartphone. As this helps you to recover the personal data when ever any thing wrong happens.

[*] Make sure you read & follow this tips & guides before you completely proceed to flashing your device. This tips are very important to be ignored.


Please Leave a comment after using these Flash files
Report if you cannot download any of these files.


Tuesday, July 12, 2016

How to make a PC detect a (DEAD) MTK device after flashing with wrong ROM/Firmware (Test Point Method)

Below are instructions on How to make a PC detect a DEAD MTK device after flashing with a wrong ROM/Firmware. It is always advisable to backup a device Stock ROM/Firmware that you are about to flash, and it is always wise not to flash the preloader.bin file found inside a ROM folder except you are really sure that the preloader.bin is exactly the one for that device. Since we are humans we are bound to always make mistakes.
If you made a mistake and flash a ROM with a preloader.bin file which is not the one of the device, the preloader partition gets corrupted thus making the device not being detected by the PC, boot or even charge ie Dead Boot. Since it cannot be detected, there is no way you can reflash the phone with the backed-up ROM or even when the original ROM of the device is now available. This post will show you how you can get your PC to be able to recognize and detect the device again if its in such situation. This process to repair dead boots of mtk devices is known as Test Point.

Disclaimer

Romshillzz is not responsible for what ever may happen to your device after using this procedure Do this at your own risk!

How to make a PC detect a DEAD MTK device after flashing with a wrong ROM/Firmware

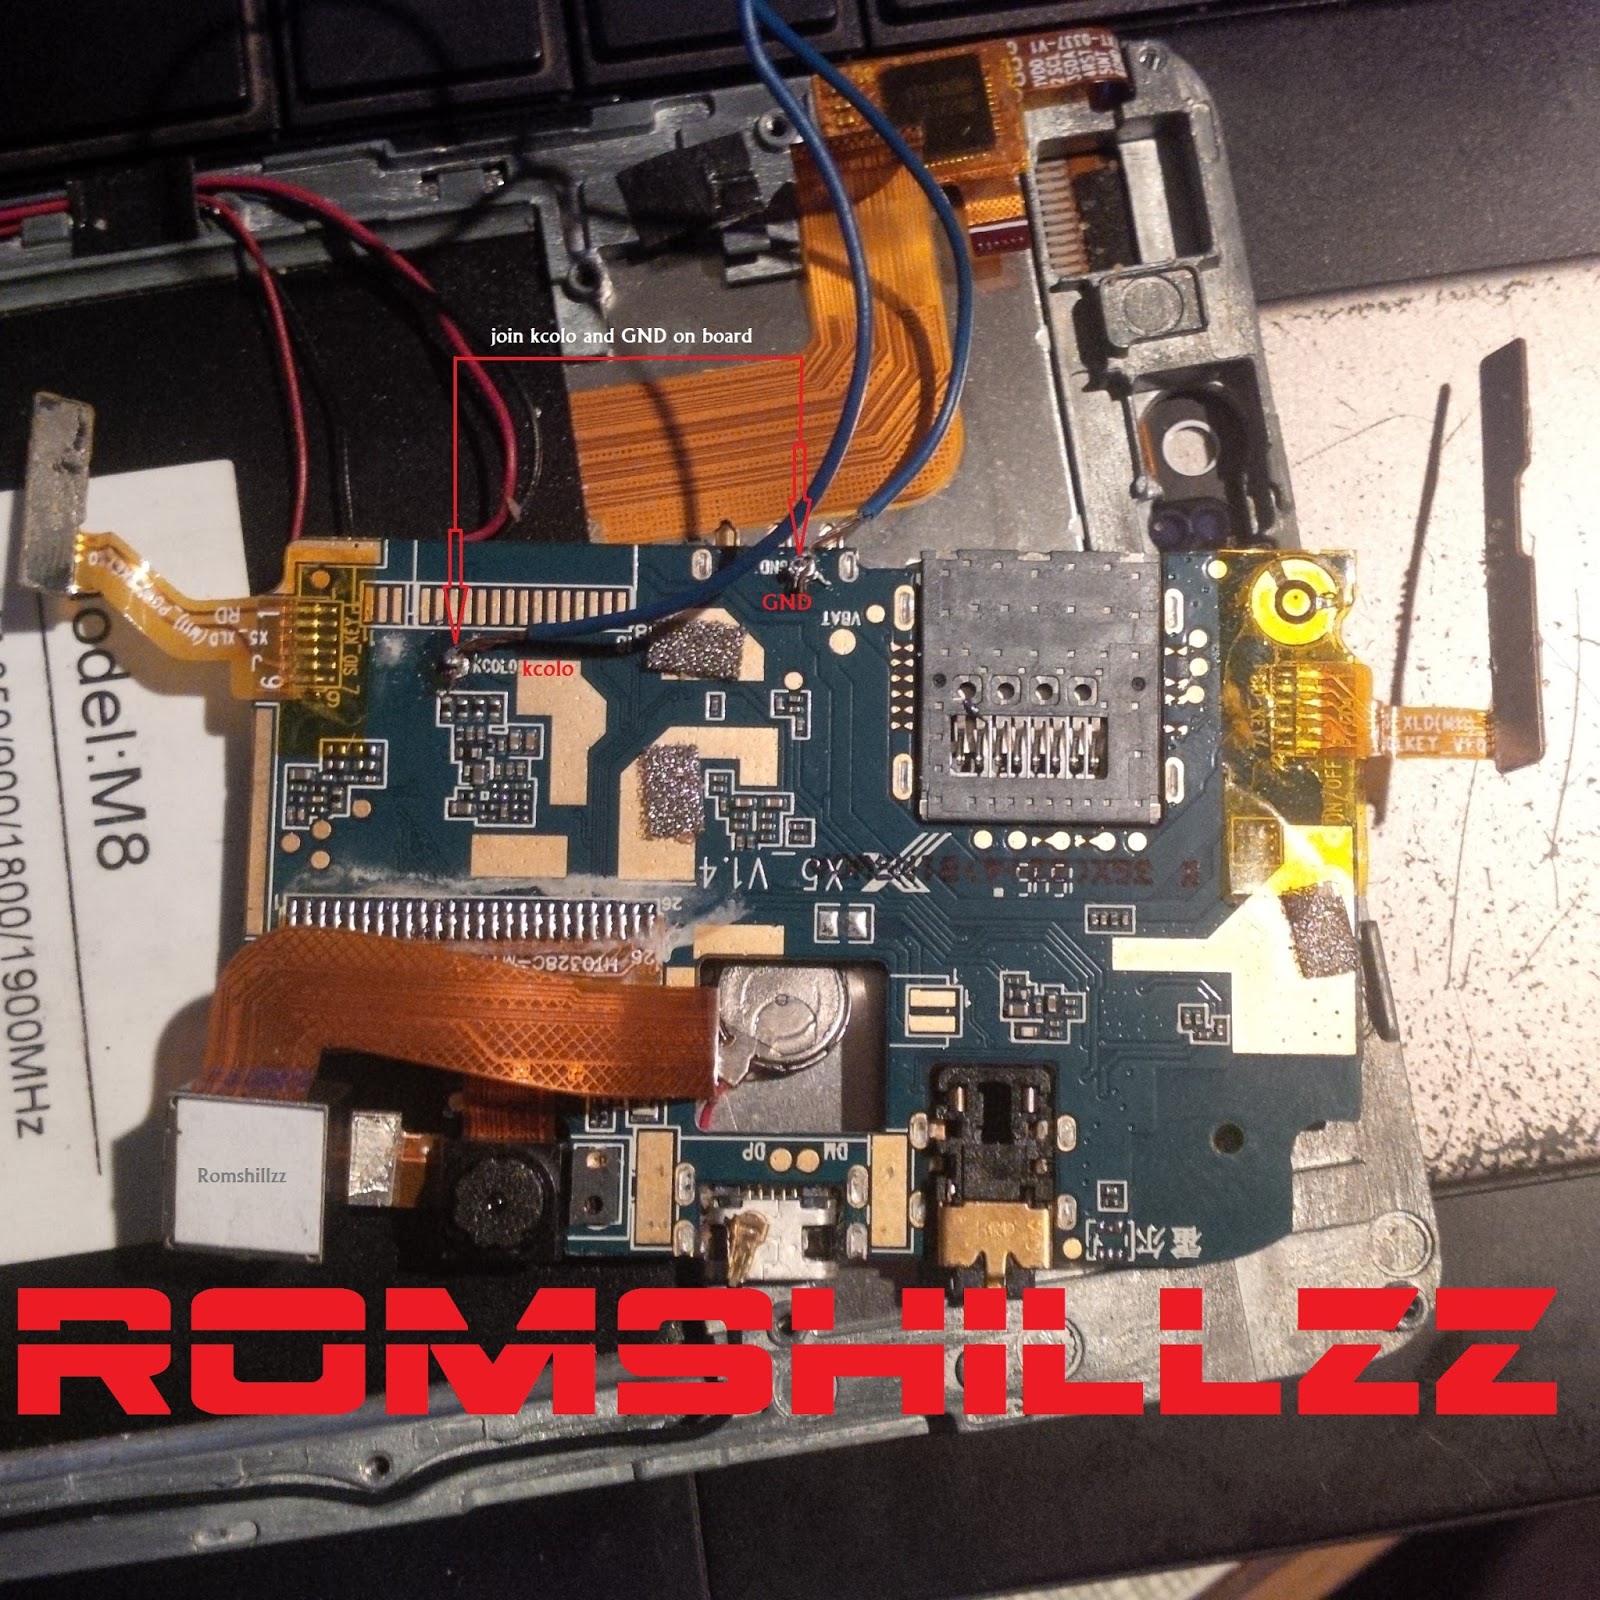
Step 1: Firstly, you will have to loose the screws of the phone (unscrew device) and take out the board. Then on the board, you will find golden or silver points with various labels like Tx, Rx, Vcc, KCOLO, COLO, KOLO, GND etc Step 2: Now locate a golden or silver point with lable KCOLO or KOLO or COLO on the board. Sometimes these points are found at the volume terminal.
Step 3: Solder a wire on that point (KCOLO, KOLO or COLO) Step 4: Locate the golden or silver point with GND or normal ground on the board.Join the wire form KCOLO or COLO or KOLO to GND on the board. After joining this 2 points, try flashing the device with it's exact (good working & matching) Stock ROM/Firmware, connect the device to the PC using USB Cord and see if it detects. If it doesn't, look for another golden or silver point with same label till your device gets detected by PC. Step 5: When your device is detected by PC, it shows as MTK USB COM inside device manager. Step 6: Now you will have to quickly flash the original preloader.bin file or complete ROM. Step 7: After a successful flash process your device, you can now cut off the wire which you connected. Couple back the phone & Reboot.  
Test Point
 

Important Notes:

[*] Never use the Tx, Rx, Vcc or any other point that carry some amount of voltage. [*] Phones with no (KCOLO,KOLO or COLO) on its board are mostly spd devices which rarely dies (DEAD MODE). [*] This method is 100% tested by me (RomShillzz).
Firmware Categories
 TECNO
 INFINIX
 GIONEE
 HUAWEI
 ITEL
 MICROMAX
 THL
 VODAFONE

What are you looking for?


We have moved! If you can't find what you're looking for, kindly head to our new website @ https://romshillzz.net | or our forum https://forum.gsmtutors.com

Sponsored

GSM-Tutors Forum

.

Instagram Follow on Instagram Follow RomShillzz

Email: romshillzz@gmail.com

WhatsApp ✆: +2348100999057


Featured Post

How To Write IMEI On MTK Android Devices Using Inferno Tool

This is a tutorial on how to Write IMEI On MTK Android Devices Using Inferno Tool. With this tutorial you can write IMEI on any version (inc...

Popular Posts

Recent Comments

Support